Tameo Renault R25. Chinese GP 2005. Fernando Alonso

I’ve been quiet on this blog for a few months, mainly because I wanted to document the entire build process in a single post. But I've realized that it might be better to update with significant milestones as I go along. So, today, I’m excited to share my latest project: the Renault R25—the car that won Fernando Alonso his first championship.
For me, choosing to build this model was a no-brainer:
1. I’m a huge Formula 1 fan.
2. Fernando Alonso is my favorite driver.
Having the Renault R25 on my shelf just felt right.
I purchased this Tameo kit over a year ago, secondhand but still new and unopened. Finally, I got around to building it. I’ve been working on it since May, and by the end of August, it was complete—although there’s still some finishing touches left. I plan to display it in a shadow box on the wall, right above my McLaren MP4/30 that I built earlier.
But enough with the intro, let’s dive into the build.
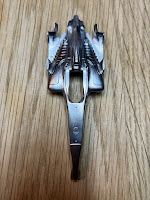
The kit is part of Tameo’s SilverLine series and includes various white metal parts, photo-etch components, turned parts, rubber tires, decals, and a color-printed instruction manual. While I would have appreciated some reference photos for the finer details, there are plenty available online. Plus, I had the chance to see the Renault R25 in person last year at Fernando Alonso’s museum, which was incredibly helpful. The turned wheels are a standout feature—they look much better than the white metal ones and don’t require additional work.


I began by polishing the monocoque and bottom plate with a metal brush, but it didn’t go as smoothly as I’d hoped. I ended up using sanding paper, the traditional method, which worked much better. To add depth to the model, I deepened the gills on the car’s sides, giving it a more realistic appearance. I also deepened the panel lines, which is essential for any model, whether plastic or metal.


Next, I drilled out the exhaust holes and thinned all the aerodynamic parts—of which the Renault R25 has plenty. I also drilled the aero intake to create more depth and volume. These small details might go unnoticed at first glance, but they dramatically change the model’s overall look.


Attaching the nose cone to the monocoque required sanding and aligning since it was completely off. In hindsight, separating the nose from the body was unnecessary and only made the build more complicated.
Moving on to the rear wing—it’s a simple structure but requires pre-assembly and soldering for rigidity. I even bought a smart soldering iron specifically for this task. Unfortunately, soldering the front wing was impossible due to its complex design and the decal scheme, which required assembly after painting and decaling. So, I temporarily glued it with micro-scale glue to check the fit.


As a modeler, I sometimes can’t resist adding extra details. This time, I decided to engrave a fabric texture onto the default photo-etched seat belts and then did a pre-assembly of the seat.


As is often the case in model building, accidents happen. I accidentally destroyed one of the aero parts and ended up laser-cutting my own. It was challenging, but the result was thinner and better than the original.

With all the parts prepped, it was time for priming and painting—nothing too special to report there.


Next came the detailing and decaling of smaller parts like the rims, tires, steering wheel, and antennas. I also added Tameo CF decals to the suspension arms. But then disaster struck—the main yellow decal, which spans the entire body, refused to apply properly. It cracked in several places and was essentially ruined. Unlike most Tameo kits, this one didn’t come with a backup set of decals. So, I took the risk of painting the livery by hand. After almost two weeks, I had to admit defeat—the paint either didn’t align properly, or it cracked when I removed the masks. I ended up ordering another set of decals, stripping all the paint, and redoing the entire process. This time, I applied the decal slowly and carefully, and it worked.


After all the decals were in place, I clear-coated the model and let it dry for a week before sanding and polishing. I used GodHand sanding sponges, starting with 4000 grit and working up to 10000. Then, I polished the surface with an AMMO stick, finishing with Tamiya Modeling Wax to protect the model and add extra shine.

Finally, the moment of truth: the final assembly. This stage is nerve-wracking because one mistake could ruin months of work. But after countless hours of meticulous effort, the Renault R25 is now complete.


Stay tuned for more updates as I continue to build and share!


Comments
Post a Comment