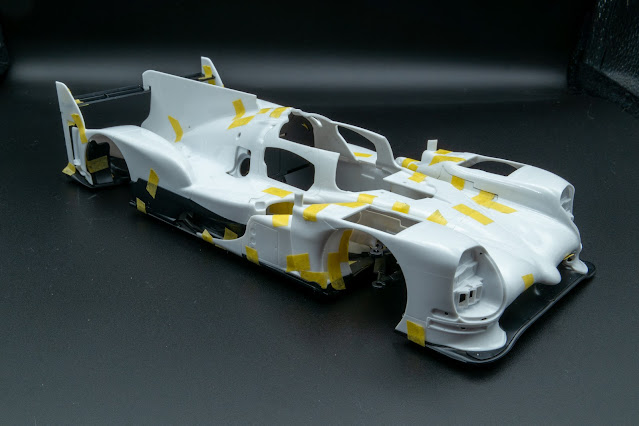
Tamiya Toyota GAZOO Racing TS050 HYBRID 1/24. Part 1 - Body Preparation
A New Beginning: Toyota GAZOO Racing TS050 HYBRID Build
With one model finished, it's time to embark on the next project. Our small-scale modeling community decided to take on a group build of the Toyota GAZOO Racing TS050 HYBRID, the 2019 Le Mans winner. While I can't say this car is a personal favorite—the design is decent, but there are more aesthetically pleasing cars in the LMP1 category—my reasons for joining were simple:
1. Fernando Alonso drove this car.
2. It's always more fun to build something as a group.
So, we all picked up the Tamiya kit along with a few add-ons, including aftermarket decals featuring the WEC logos, which aren't included in the standard kit.
Pre-Assembly: Setting the Stage
Even though Tamiya kits are renowned for their high quality and precision, it's always worth doing a pre-assembly to ensure all the parts fit together flawlessly. That’s exactly what I did, with the exception of aligning the clear parts and wheels.
When it comes to clear parts, I tend to save them for the very end to avoid scratching or damaging them. As for the wheels, they’re typically adjustable, and unless I plan to modify the ride height, I don’t bother checking their fit too early—especially for race cars.
Pre-assembly can range from a few hours to several days, depending on the complexity and level of detail you want to achieve. Given this is a Tamiya kit, I was pleasantly surprised by how perfectly everything fit together. No prep work needed—so now I can move on to the real task.
Planning and First Steps
Before diving in, I carefully reviewed the assembly instructions and laid out a plan. Some parts are better glued together in advance to simplify the painting process. I started by assembling the cockpit, then moved on to deepening the panel lines. This helps to enhance the shadows and volume, making the lines more pronounced.
It's not just the panel lines that need attention. The bolt holes also needed to be deepened. I used a 0.4mm drill for the smaller ones and a 0.5mm drill for the slightly larger ones.
Another important detail is the fin on the rear cowl, which comes as a separate part in the kit. On the real car, however, it’s integrated into the cowl. To replicate this, I glued the fin in place and used putty to remove the seam. I chose white primer, which fills the seams nicely and is easier to sand afterward.
I also removed some mold lines to ensure the body remained smooth and clean.
Prepping for Priming
With the prep work complete, I sanded all the body parts with a 600-grit sponge. This ensures better adhesion for the primer and creates a more even surface.
Now, it’s time to prime the model and start bringing it to life.


Comments
Post a Comment